


FVM is a tool that is used to manage different Flutter SDK versions. If you are working on a single project with only one version of Flutter then this tool may not seem to be very useful. It comes in very handy and also saves a lot of your time if we have to deal with projects with multiple versions of Flutter because switching is not easy in Flutter. You can compare and try switching the versions by using and without using fvm by following the steps mentioned down below. It can be a hassle switching between Flutter versions if we have to work on different projects using different versions. With FVM, it is a piece of a cake, we just have to learn a few flutter commands, and if you are familiar with nvm, gvm, etc which are the versions managers of other programming languages then it further becomes easier as they are more or less similar to each other.
Fvm Commands
“
fvm releases”: List the available flutter versions
“
fvm install <version>”: to install Flutter version 2.0.6 the command should be “fvm install 2.0.6”.“
fvm list”: to list all the flutter versions installed in our system using fvm“
fvm remove <version>”: to remove specified flutter version“
fvm global <version>”: to set the global flutter version“
fvm use <version>”: to set the flutter version ProjectWise. And to do that we must run this command within the root of the flutter projects or else it won't work. Also if the version is not available in the system then it will first install it and then make use of it.“
fvm doctor”: to display the current fvm version and its configuration
Switching the flutter version using FVM
We just have to go to the root of the repository and run the command fvm use <version> . After that, the project will use the version that was specified in the command. Also, it should be noted that we can have any number of projects with a different version, and switching the version in one will not affect the other. They maintain the configuration separately which can be located in the ".fvm" folder of each of those projects. If that folder is not present, it means that the flutter version is not configured for that project using fvm. In that case, it uses the version that is set globally. If you are using IDEs like Android Studio or VSCode then, we must configure them accordingly so that it recognizes the version set by FVM.
Global and Project specific versions
We can have the global version set which can be done by running the command: fvm global <version> Now this version will be used for every project unless we set the version project-wise. We can set the version project-wise by running the command fvm use <version> in the root of the project directory.

Different ways to switch flutter versions
Flutter has two commands
flutter upgradeandflutter downgradeto upgrade to the latest stable release and downgrade to the latest version. For example: If our current flutter version is 2.0.0 and the stable release is 3.0.0 thenflutter upgradewill upgrade our current version to 3.0.0 andflutter downgradewill revert our current version back to 2.0.0. i.e. These commands are useful to switch between these two versions only and the switching is time-consuming since switching requires the re-downloading of the SDK every time. Also, these commands wouldn't work if we were to switch to other versions besides 2.0.0 and 3.0.0.Channels: We can also check out the Flutter channels for the versions that we need. Run
flutter channelto list the available channels. To switch to any of the listed channels, we can runflutter channel <channel_name>followed byflutter doctordownloading the required SDKs. Finally, runflutter --versionto check the version in that particular channel.Switching to a specific flutter version: We can only switch to those versions that are available in the flutter channels with both of the above-listed methods. With this method, we can switch to any available version, and for that first visit the Flutter repository to check if the version is available.
Flutter repository:https://github.com/flutter/flutter
On the website, find the branch dropdown and click it to make the dropdown popup appear with two tabs branches, and tags. Click the Tags tab and search for the version that you are trying to switch. If you cannot find the version there then the version probably doesn't exist. And if the tag name with your version is there then you can use that version.
Now we can switch to that version by going to the flutter directory in the terminal and switching to that tag_name.
Locate the directory where Flutter SDK is stored:where flutteror if the above command doesn`t work then runflutter doctor -vwhich outputs the directory where flutter is installed in the first line of each section.
Switch the Flutter version: Open the terminal and navigate to the Flutter directory by running the commandcd path_to_flutter_directory. Now on the flutter directory run the git commandgit checkout tag_name. For example, if the version is 3.0.0 then the command would be:
git checkout 3.0.0
Finally, runflutter doctorto download the necessary files and folders and make sure everything is working fine.
Run the commandflutter —-versionand it should output your version.
All of the above-mentioned methods are very time-consuming and complex. It redownloads the SDK files again even though we had already used that version previously. But with FVM the version-switching process is very simple and short. We just have to install it and learn some of its commands which are very easy as compared to the above-mentioned steps. Also, it maintains each version that we switched in the system's local cache so that it does not have to re-download all the required files when we switch back to it.
Installation (macOS, Ubuntu, and other UNIX systems)
- Standalone Installation— (*recommended)
*Make sure you havebrewthe package manager installed and if not visit the website https://brew.sh/ to install it.
Now to install/uninstall fvm run the following commands in the terminal.
#run the following two commands to install fvm
brew tap leoafarias/fvm
brew install fvm

#run the following two commands to uninstall fvm
brew uninstall fvm
brew untap leoafarias/fvm

#Also delete the fvm cache directory if you want to remove all the cached files and folders. The cache directory could be known by using the command fvm list
- Pub package InstallationMake sure you have
dartinstalled and if not visit the website https://dart.dev/get-dart to install it.
Now to install/uninstall fvm run the following commands in the terminal.
#run the following command to install fvm
dart pub global activate fvm

#run the following command to uninstall fvm
dart pub global deactivate fvm

#Also delete the fvm cache directory if you want to remove all the cached files and folders. The cache directory could be known by using the command fvm list
Installation (Windows)
- Standalone Installation — (*recommended)
*Make sure you havechochopackage manager(chocolatey) installed and if not visit the website https://docs.chocolatey.org/en-us/choco/setup to install it.
Now to install/uninstall fvm run the following commands in the terminal.
#run the following command to install fvm
choco install fvm

#run the following command to uninstall fvm
choco uninstall fvm

#Also delete the fvm cache directory if you want to remove all the cached files and folders. The cache directory could be known by using the command fvm list
- Pub package InstallationMake sure you have
dartinstalled and if not visit the website https://dart.dev/get-dart to install it.
Now to install/uninstall fvm run the following commands in the terminal.
#run the following command to install fvm
dart pub global activate fvm

#run the following command to uninstall fvm
dart pub global deactivate fvm

#Also delete the fvm cache directory if you want to remove all the cached files and folders. The cache directory could be known by using the command fvm list
IDE Configuration
We should properly configure IDE and fvm for better support for different development environments. FVM creates a relative symlink in the projects it is set up from ”.fvm/flutter_sdk“ to the cache of the selected version.
Android Studio
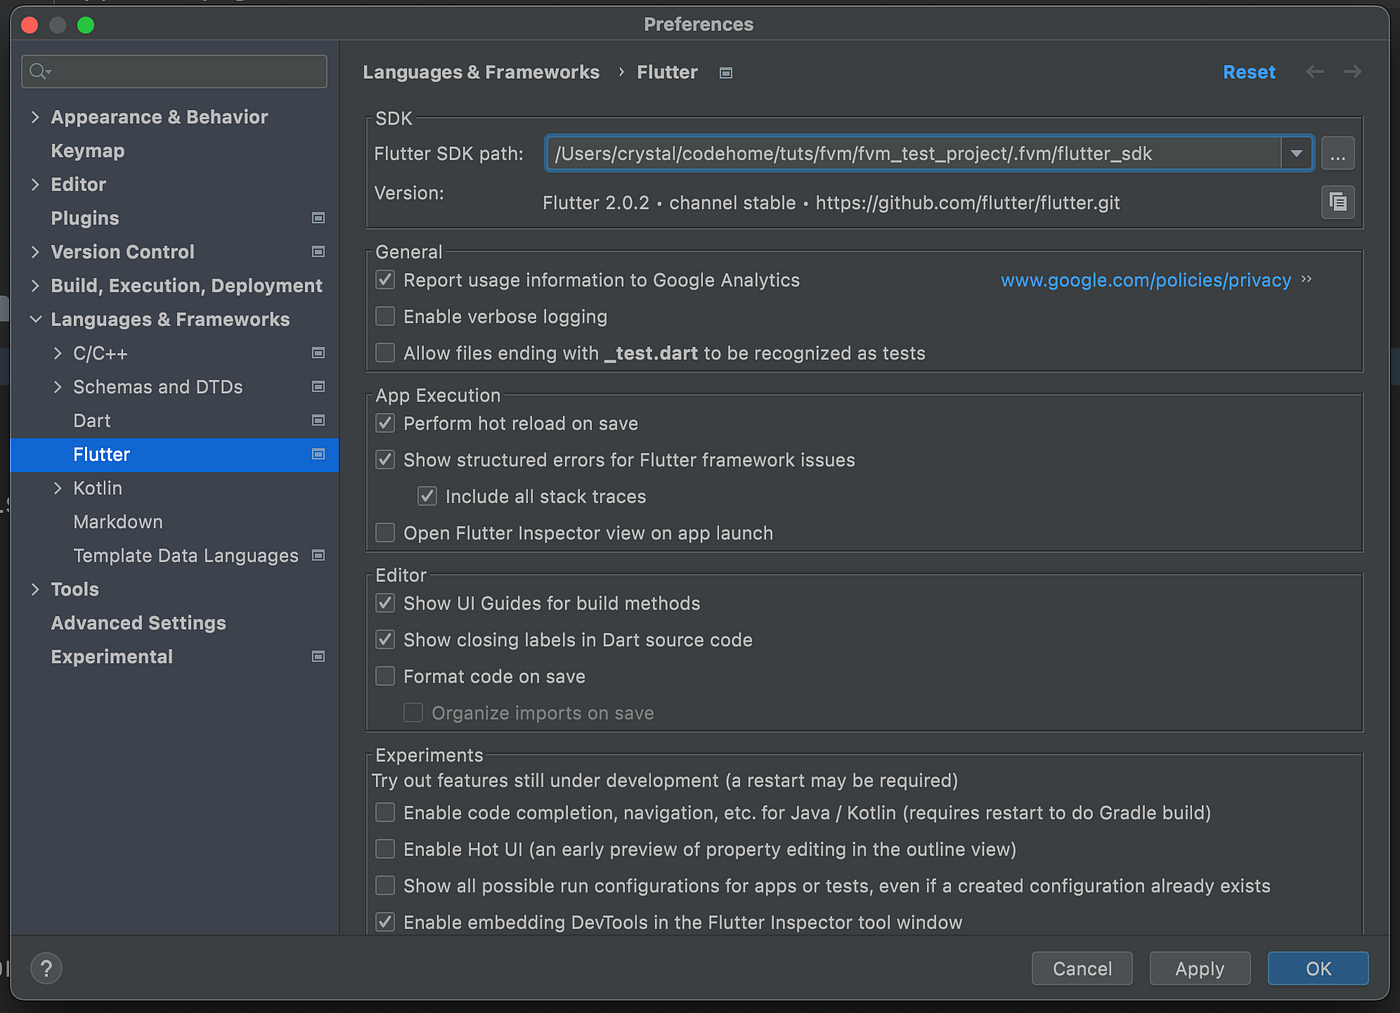
- In the Android studio, Go to
Languages & Frameworks -> Flutteror search for Flutter and change the Flutter SDK path.

Copy the absolute path of the fvm symbolic link in your root project directory. Example:
/absolute-path-to-the-project/.fvm/flutter_sdk
You can also set the path to the global version here if no version is set project-wise in certain Flutter projects.
Note: The.fvmfolder is a hidden file.
Show the hidden content:
MacOs: Cmd + Shift + Period(.)
Ubuntu: Ctrl + HApply the changes.
Restart Android Studio to see the new settings applied.
With this configuration, Android Studio will use the version that is set by fvm project-wise. Also, it should be noted that this should be configured only once for each project. Even though we switch between different projects, the configuration for each project that is set before remains intact.
Here “/Users/crystal/codehome/tuts/fvm/fvm_test_project/” is the project directory.
VS Code(Visual Studio Code)
Method 1: — Automatic Switching(Recommended)
Open the “.vscode/settings.json” file of the project directory and make the following changes. This file may not be present and if not just create it.
{
  "dart.flutterSdkPath": ".fvm/flutter_sdk",
  // Remove .fvm files from search
  "search.exclude": {
    "**/.fvm": true
  },
  // Remove from file watching
  "files.watcherExclude": {
    "**/.fvm": true
  }
}
This configuration is similar to the one that we did for Android Studio. ie. VS Code will use the version that is set by fvm project-wise.
Method 2: — View all SDKs (Manual switching)
VSCode has the ability for you to switch between all installed Flutter SDKs using Flutter: Change SDK command in the command palette.
Open Command Palette:
macOS: Cmd + Shift + P , Others: Ctrl + Shift + P
But before running the command update following the “.vscode/settings.json” file
{
  "dart.flutterSdkPaths": ["/Users/usr/fvm/versions"]
}
This lists all versions of flutter installed using fvm. Alternatively we can also add one or more versions manually to list only those versions by VSCode.
{
  "dart.flutterSdkPaths": [
    "/Users/crystal/fvm/versions/stable",
    "/Users/crystal/fvm/versions/2.0.6"
  ]
}
Now to change the current Flutter version open the command palette and run Flutter: Change SDK. You should see only those versions as shown in the above code snippet. In this case, only “stable” and “2.0.6” will be listed to be selected and once we select the version following entry will be automatically updated by the command in the “.vscode/settings.json” file given that we chose version 2.0.6.
{
  "dart.flutterSdkPaths": [
    "/Users/crystal/fvm/versions/stable",
    "/Users/crystal/fvm/versions/2.0.6"
  ],

//following entry is automatically added after running the command    //Flutter: Change SDK in the command palette and choosing version //2.0.6
"dart.flutterSdkPath" : "/Users/crystal/fvm/versions/2.0.6"
}
And that's it guys, we have reached the end of this tutorial. I recommend this tool to everyone or at least try it out. You can also check out the YouTube video at the start of this article for a more detailed explanation. Please do leave your thoughts in the comments section if you have any suggestions or questions about this article. Thank you for reading.
#flutter, #fvm, #flutter_version_management, #version_management, #install_fvm_macOs, #install_fvm_windows, #fvm_video_tutorial, #multiple_flutter_version_without_fvm